↓
In its early days, the film industry was based on fairground art produced in large quantities, solely for public consumption, never intended to be preserved. Then, with the creation of major film production studios in France, Italy, the United States, and Germany, production intensified and the cinematographic heritage grew considerably. However, it wasn't until the 1930s-40s that awareness of preservation issues emerged, with the creation of film archives and notably the FIAF in 1938.
The first instincts were to collect as many films as possible and show them to the public. It was only later, faced with the increasing deterioration of film reels, that the need for preservation became apparent, leading to the development of strict standards regarding storage conditions, humidity control, and the choice of containers.
Digital restoration itself is an even more recent profession, due to the digital technologies inherent in its development. To fully understand its challenges, one must return to the fundamentals and consider everything that is intrinsic to film, particularly its material and properties.
What is film?
Film consists of two parts: the base, which is the glossy side, and the emulsion, which is the matte side.
The base
The base is what the image is "placed" on. Over time, several bases have existed, one replacing another for safety and preservation reasons.
nitrate → acetate → polyester
The emulsion
The emulsion constitutes the very essence of the film image. Made up of photosensitive silver salts embedded in a gelatin layer, it reacts chemically during development. During shooting, the unexposed film in the camera captures light according to precise aperture and speed parameters, thus determining image quality. Overexposure results in a whitish image due to excess light, while underexposure produces an image that is too dark due to lack of brightness.
During filming, the image is only latent. It is revealed by passing through several chemical baths which, in reaction to the silver salts, will produce the image.
The Defects of the Film
Several types of defects can be identified. Some are related to the medium. Nitrate films, for example, are very fragile and tend to self-destruct and decompose over time. Significant image distortions due to medium decomposition can occur.
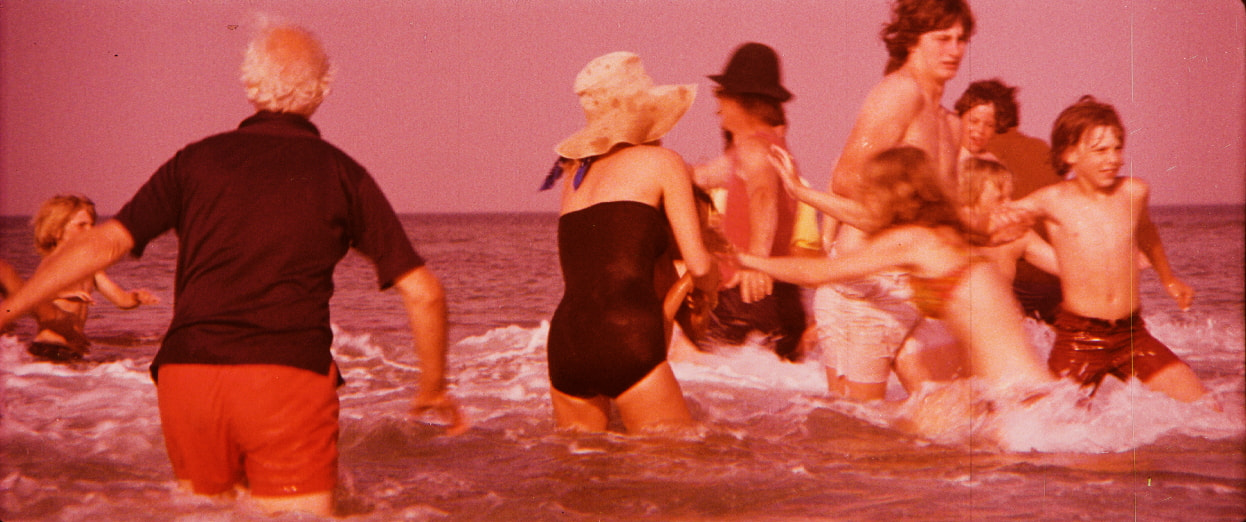
Acetate primarily suffers from vinegar syndrome, a phenomenon that gradually alters the film's colors. Affected prints often shift to red or green. To preserve these films, two actions are essential: storing them in optimal conditions to slow down their acidification, then digitizing them to try to recover their original chromatic data.
Other defects, more related to the passage of time, the use of prints, and storage conditions, will attack the film emulsion. These can include accumulated dust, scratches, mold (due to poor storage and/or humidity), tears, or flicker (luminous pumping).
The Pink Copies Scandal
From the 1950s onwards, expensive colorization processes gradually lost their monopoly to lighter and more affordable techniques. Thus, Glorious Technicolor and its imbibition process, so dear to cinephiles' hearts and producers' wallets, was dethroned by Eastmancolors and Kodak film stocks.
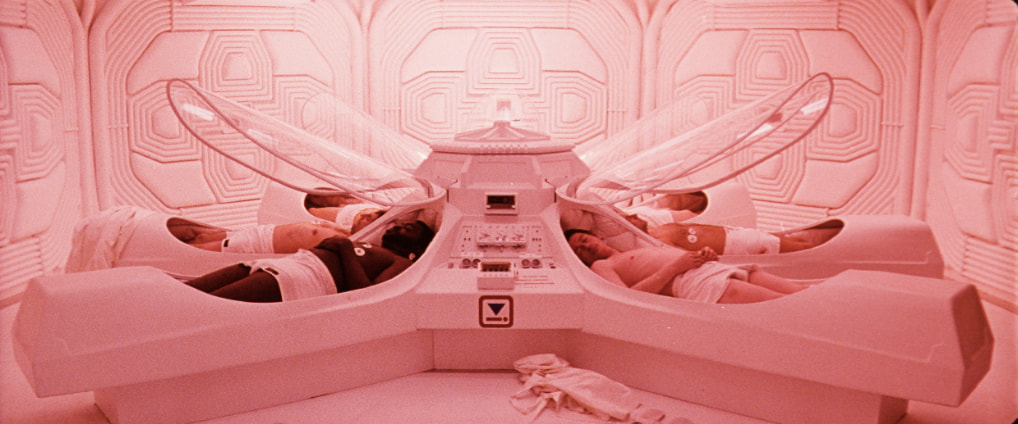
Thirty years pass, New Hollywood establishes itself and produces great films such as 2001: A Space Odyssey (Stanley Kubrick, 1968), Alien (Ridley Scott, 1979), and Taxi Driver (Martin Scorsese, 1976). In 1980, during a special screening of the latter, Martin Scorsese retrieved his negative and discovered it had turned magenta. He raised the alarm. He wasn't the only one affected as Spielberg lamented the damage to Jaws: « After five years the blue disappears from the waters of Jaws while the blood spurting from Robert Shaw's mouth becomes increasingly red » he stated, and as you can see opposite, the passengers of Alien's space freighter are sleeping in a room that has turned pink. Scorsese then launched a campaign in the USA against the color deterioration of films shot on Kodak / Eastmancolors film stock.
At the Venice Film Festival, with the support of many filmmakers such as Michelangelo Antonioni and international press journalists, he gave a spectacular demonstration of the effects of time on color films. He emphasized the process that succeeded the imbibition of three-strip Technicolor, known for its beauty and preservation quality. The Eastmancolor process consists of a single print on a chromogenic development positive and inevitably deteriorates after 3 to 5 years. Kodak film emulsions particularly suffer from poor preservation of the cyan layer, hence the shift to red when the blue breaks down.
Following a petition that gathered all of Hollywood and film archives worldwide and called for, among other things, the return of Technicolor, Kodak revised the chemical components of its products. Through its high publicity, the affair sparked interest from a public that was almost completely unaware of these issues related to the preservation and restoration of film heritage. It also marks Scorsese's and his accomplices' first steps toward creating institutes aimed at protecting this heritage, as he established the Film Foundation in the late 1990s. A foundation that oversees and funds numerous restorations.
Films' Generations
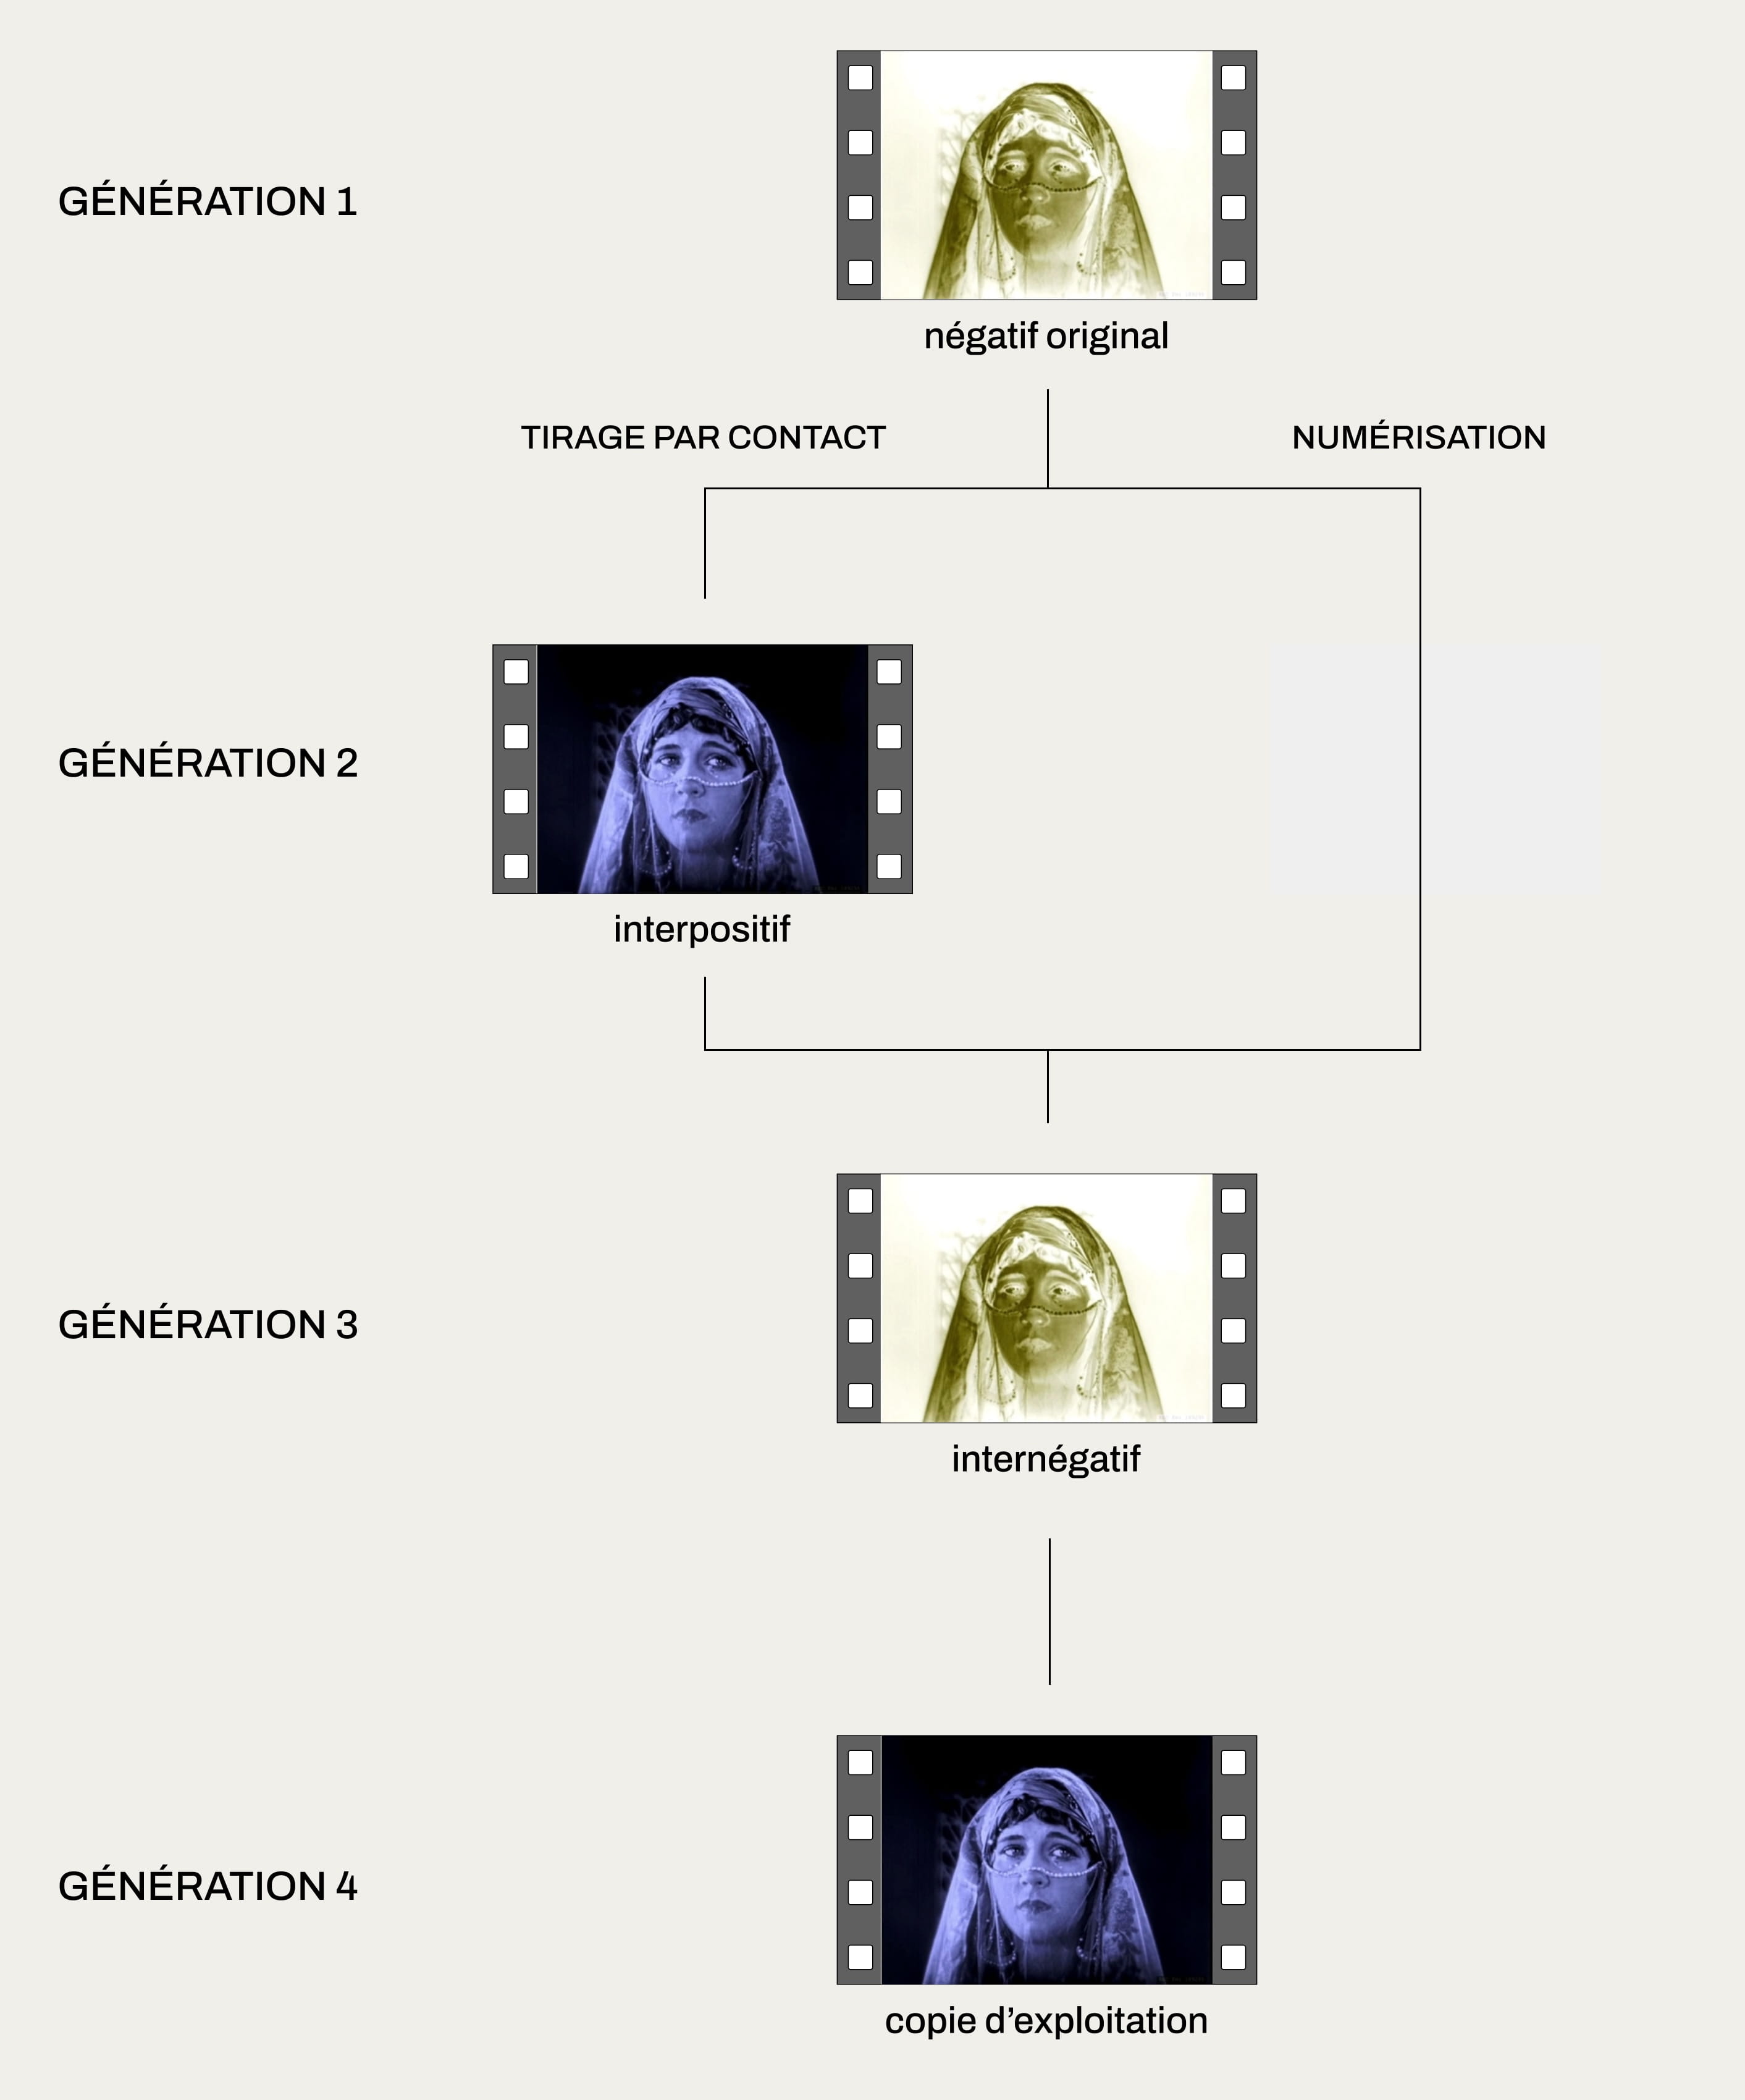
To understand film, you must also know that a movie starts from a negative, but there are then several generations of the film.
The negative is the film that was in the camera. It's the original film and there is only one. It will be edited, but certain effects or tricks or title sequences require a superimposition of film and therefore intermediate prints. From the negative, interpositives and internegatives are made, then prints that will be shown in theaters. What we see in cinemas is actually a fourth generation derived from the original negative, which has therefore lost resolution and texture precision: it's like a photocopy of a photocopy of a photocopy...
When restoring a film, we try to have as source material the most beautiful element in the best possible condition. Often the negative will be chosen because it is the original element, and therefore with the highest possible resolution. But paradoxically, this is also something that viewers have never seen, because a negative is never projected in theaters.
Editing splices concern both the original negative and the film prints. In the negative, the glue delicately fuses the last frame of one shot with the first of the next, sometimes creating subtle thickening at the junctions. While prints naturally reproduce these splices photographically, they also undergo repairs over time, particularly using tape. As this tape degrades, it releases a greasy substance that alters the image. Restoration must therefore take into account all of these characteristic defects.
Preliminary Steps
Film Repair
Before proceeding with digital restoration itself, the film will undergo Film Repair. The operator in charge unrolls the film on a light table and checks its physical condition. The goal is to detect any defects that weaken the film, signs of poor general condition, or risks that could hinder the proper scanning process later. Indeed, the work is twofold: analyzing the film, assessing its condition, but also strengthening and repairing it so it can withstand the tension it undergoes during scanning.
The defects targeted during Film Repair are tears, damaged perforations, failing tape, or conversely, tape that's too sticky. The flexibility of the support is also checked - is it too dry, risking breakage during handling? Is it too sticky, risking emulsion transfer onto the back of the film when rolled up? Some institutions place films in bell jars to better control humidity levels, and conversely, subject them to high-temperature oven treatments, all to restore flexibility to the film for proper handling.
It's also possible to have multiple elements of the same film and compare them during Film Repair to determine which is most suitable, in better condition, and of better quality for digital restoration.
Scanning Process
After preparation and any necessary repairs, the film is ready for scanning. This crucial step transforms analog images into digital data, paving the way for computer-based retouching, cleaning, and restoration operations. The major advantage of this digitization is its total reversibility: the raw scan constitutes a faithful backup of the film's condition at a specific moment of its degradation, allowing work to be resumed from the beginning if better restoration tools emerge later.
Color Grading
Color grading is distinct from digital restoration itself. It is a separate step, performed by a different profession, and can be carried out either before or after restoration, depending on the laboratory.
Color grading involves modifying the colorimetry of an image to harmonize film sequences, match cuts between shots, or create a particular lighting atmosphere. In heritage color grading, the technician does not intervene intrusively in the image; they won't change the warmth of a scene or modify the main ambient tones. The goal is to recover the original colors of the film in cases where a print has shifted, becoming entirely red or green, or to harmonize multiple elements from different sources to smooth transitions between elements. When restoring an original negative, which has never been color graded, we try to find a print of the film to have a baseline for recreating the film's original color grading. Similarly, to recreate tints for black and white silent films that were tinted, we try to match existing prints and visual sources that can be viewed on a light table, to best correspond to the tints used in the period.
Color grading is mainly done using Da Vinci's Resolve software.
Digital Restoration
Once color grading is complete, we move on to digital restoration. This can be done using several software programs, the main ones being Diamant by HS Art, Phoenix and Nucoda by Digital Vision (now Filmworkz), and DRS Nova by MTI.
The principle of digital restoration is as follows: we want to "clean" the film to remove all alterations related to time, careless handling of elements, poor storage, or deterioration of the film itself. However, we do not correct filming defects (a boom mic entering the frame, an unstable shot, etc.), development or printing defects (fogging, light leaks, etc.). We leave everything that we know was present from the beginning.
Restoration is done in several steps. Here is an excerpt that we will use to illustrate these steps:
Stabilization
This step allows us to "smooth out" the jumps that can occur during scanning. The overlapping thickness of splices, mentioned earlier, can create a small jump when passing through the scanning mechanism. Tears and subsequent repairs also disrupt the alignment of the film perforations and result in poor stabilization during scanning. But film instability can also come from the printing process when dealing with copies. Indeed, during printing, the original film may not be positioned exactly in front of the new film stock, down to the millimeter, thus creating misalignments at the perforation level.
The scanner's internal software, using perforations to respect the image frame, will reference the latest generation of perforations. When scanning a copy, several generations of misaligned perforations follow one another between the stable base image and that of the copy, which can thus slightly wobble.
Flicker
Once the image is stabilized, we can proceed to treat the flicker. This step is not mandatory as some films don't have this defect, unlike dust which is always present.

The software analyzes brightness variations within a single shot to harmonize luminance between successive images. This correction is similar to color grading but is applied frame by frame rather than between shots, thus eliminating unpleasant flickering effects.
However, this operation requires special attention. Indeed, the software may confuse certain rapid movements (panning shots or sudden movements) with brightness variations. It is therefore essential to adjust the tool's power according to the nature of the shot being processed. For example, a static shot with little movement will require different processing than a dynamic action scene with rapid panning.
This principle also applies to the next step: dust detection and removal.
Detection and removal of dust and scratches
The process relies on a sophisticated filter that automatically examines each shot, pixel by pixel. To detect imperfections, the system compares the value of each pixel with its equivalents in the previous and following frames. When a color variation is identified, whether black, white, or colored (in the case of color films), the software interprets it as a blemish to be corrected. This is why preliminary image stabilization is crucial: it ensures optimal analysis by the software during this stage.

Pixel color variations can have various origins. While they are often due to dust, they can also result from movement, water reflection, jewelry shine, or even the natural brightness of teeth and eyes. The restoration technician must therefore exercise discernment: they need to identify and treat only genuine dust traces, avoiding confusion with other elements such as a bird passing by or the sparkle of a smile. Once dust is correctly detected, the filter automatically eliminates it by reconstructing the missing information through interpolation between the preceding and following frames.
After dust has been eradicated, scratches are tackled using another automatic detection filter.
Here, the principle of detection and recreation of missing information is slightly different because the software seeks to identify anything that is vertical and potentially present across several consecutive images. In this case, scratches can be confused with vertical decor, bars, or wallpaper.
The real scratches that are identified are corrected, not through interpolation of before and after images, but by recovering information from the sides of the scratch, just to the right and left, and "stretching" the information from these pixels to fill in the scratch groove.
Image Retouching
Once automatic filters have been applied and verified, only large defects remain on the image: tears, mold, significant stains, or glue residue. This is followed by meticulous retouching work. This can take various forms: recovering missing information from adjacent images, manual interpolation between two frames, or frame-by-frame retouching, similar to Photoshop.

Finalities of Restoration
All these software manipulations aim to produce a version of the film that is as faithful as possible to the original work.
However, the purpose of the restoration greatly influences the choices in the treatments applied. Indeed, a restoration for heritage purposes for archives will not follow the same criteria as a version intended for film festivals, television broadcast, or DVD release. Requirements vary according to the context of projection and distribution. Thus, for a general public television broadcast, more significant retouching may be necessary, sometimes removing original imperfections, to adapt to current visual standards.
A very concrete example can be that of the camera hair. During film shooting, despite meticulous cleaning of the camera before each take, microscopic particles can remain inside it, particularly on the edges of the gate. These residues, once photographed, create a characteristic effect on the edges of the image, called "camera hair" due to its stringy appearance. Although it can be visually disturbing, this type of defect, intrinsic to the image and uniformly present throughout an entire shot, traditionally escaped restoration possibilities as it was difficult to treat and remove. Nevertheless, the emergence of new AI tools now makes it possible to process and remove this "defect". But then comes the ethical question: should we really remove it? Camera hair is part of the essence of film image, just like grain and certain colorimetry. Removing it would distort the image, erasing defects that are inherent to its existence.
The question "how far should we go in restoration?" is approached differently according to several factors: the project sponsors, the available budget, and the intended objective, whether heritage or commercial. The profession is currently undergoing a profound technological transformation, with constantly evolving tools. This transformation is accompanied by new reflections, both ethical and archival, which will continue to enrich the practices of the sector.
While waiting to see what directions the profession will take in the coming years, we will always have the beauty of images that cannot be saved. Moments frozen by the digitization of photographs that are disappearing, decomposing, melting, molding, drying out. As many "flaws" as new compositions created by the randomness of degradation. Occasional incursions into the frame or abstract and nebulous colonizing organisms, each photogram becomes unique and fascinating.